
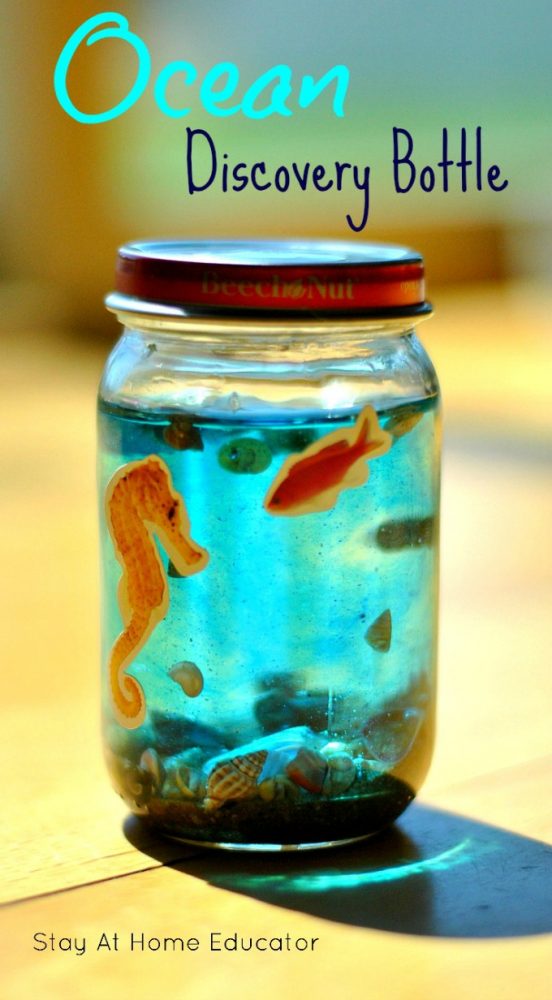
Ocean Discovery Bottle to Teach About Waves
Looking for some ocean science activities or ocean sensory activities? This ocean sensory bottle does both! Read about how to make this cool discovery bottle and see how it teaches preschoolers about the ocean waves.
Teach About the Ocean Waves with Ocean Discovery Bottle
Exploring an ocean theme with preschoolers is more than just learning about ocean animals. There is so much more to the ocean than doing octopus crafts, adding whales and dolphins to the water bin, and doing the crab walk. (Although we certainly include all those things in our ocean studies in preschool!)
But what about learning about the ocean floor and how it responds to waves and tides?
That’s what’s so great about these ocean discovery bottles! With a swish of the bottle, children can see how powerful the ocean can be and how it changes the floor of the ocean.
FAQ About Teaching Preschoolers About the Ocean
Read, explore, and play! Begin by asking the children what questions they have about the ocean or something that they want to learn more about. Devote time to learning about aquatic animals, and their special characteristics. Help children identify what they might see at the ocean shore such as sea shells, seaweed, or sand.
Consider introducing an ocean sensory bin for children to interact, play, and learn with. Play dough is also a fun hands-on learning activity for an ocean or beach theme, too.
Preschoolers should be able to: recognize and identify different kinds of common ocean animals, share a few details about various ocean creatures, recognize that some animals are large predators (sharks and killer whales) while others are bottom feeders, compare animals that live in the ocean/those that don’t, and understand that the ocean produces over half of the world’s oxygen.
It’s also important that we teach our young children to keep the ocean trash-free and support efforts to recycle and reuse.
Help preschoolers understand that the ocean needs our help. Keep plastic out of the ocean by using reusable drinking and lunch containers. Participate in an ocean/body of water cleanup. Invite the preschoolers to brainstorm ways that they can help the ocean and ocean animals for our future.
Make an Ocean Discovery Bottle with Preschoolers
Our ocean discovery bottles turned out even better than expected. It was one of those things I had imagined in my mind, but without executing prior to actually doing them in preschool, there was a chance the discovery bottles wouldn’t turn out as perfectly as I was imagining.
But…they did. In fact, they turned out far better than the picture in my head.
And my preschoolers adored them.
I mean, Mom and Dad showed up at pick up time and every student jumped up to show off their ocean discovery bottle, shaking them and explaining what they knew about the ocean.
That excitement is when I know I’ve done something right.
With a few simply and inexpensive materials, this will easily be an activity that gets revisited each year.
Materials for Ocean Discovery Bottle
- empty, clear jar, such as aVOSS Artesian Water Bottles (We used baby food jars, which was risky since they are made of glass).
- sand
- water colored blue
- tiny seashells
- ocean animal stickers
- hot glue, super glue, or other “childproof” glue
- plastic food trays (optional, but to contain any mess)
The Set Up
Place the sand in a bowl with a small scoop. We used a scoop from baby formula.
Place the tiny seashells in another bowl. Set out a bottle on each food tray and invite your preschoolers to make their own discovery bottle.
Put some water (colored blue) in a small pitcher, small enough to make it easy for your preschooler to handle.
How to Make an Ocean Discovery Bottle
The steps in making the discovery bottle are pretty simple.
Add a few scoops of sand. The amount is up to the preschooler, but the more sand the less “action” there will be from the “waves”. Most of my preschoolers opted for three to four scoops of sand to make their ocean floor.
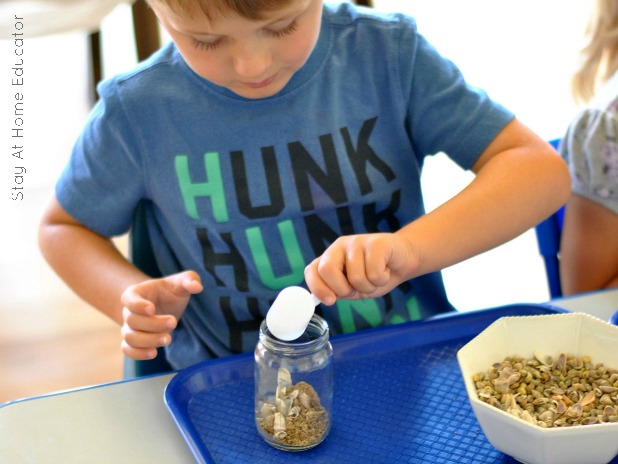
Now invite your preschooler to add some seashells. My students loved talking about what teeny tiny animals must have lived in our teeny tiny shells.
In a previous activity, we had used magnifying glasses to look closely at the sea shells, and we even added some to our sandbox, which the children still love finding. Add a scoop of tiny seashells.
Now add some colored water, filling the bottle mostly to the top, but leaving about a quarter inch to a half an inch of head space. You can add glitter, too, since the ocean sand glistens in the sun.
Seal tightly with a fast-drying, kid proof glue. We used hot glue.
Finally, add some ocean animal stickers to the outside of the bottle and enjoy!
What to Do With Ocean Discovery Bottles
This is always a question that is asked about discovery bottles. What do you do with them?
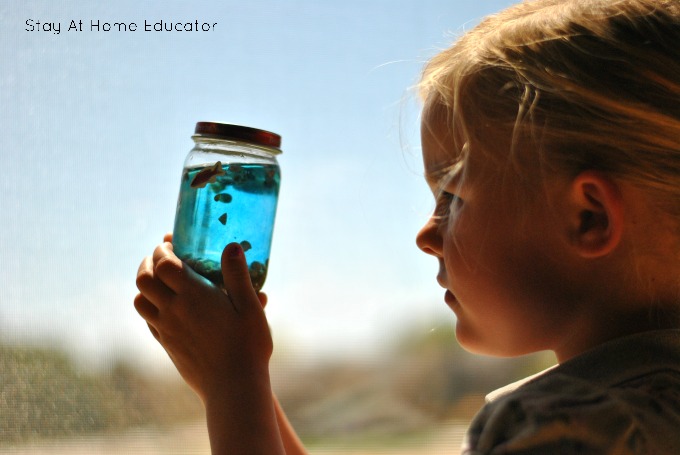
The preschoolers loved tilting their ocean discovery bottles to watch how to seashells and the sand moved. My daughter held hers up to the window and immediately noticed the clarity of her “ocean” as the additional light poured through the bottle.
Other preschoolers shook their bottle vigorously, then put them on the table to watch the sand and seashells slowly fall back into place.
Related Reading
Mostly, a discovery bottle, especially our ocean bottles, are tools for observation and preschoolers learn how their actions impact what is in the bottle.
In the case of our ocean discovery bottle, the preschoolers learned how moving the bottles caused the water to move, which moved the sand and tiny seashells. And depending on the type of movement, resulted in very, very different outcomes.
More Ocean Sensory Activities for Preschoolers
-
 Product on saleWinter Literacy and Math Activities BundleOriginal price was: $16.00.$12.00Current price is: $12.00.

I’m Sarah, an educator turned stay-at-home-mama of five! I’m the owner and creator of Stay At Home Educator, a website about intentional teaching and purposeful learning in the early childhood years. I’ve taught a range of levels, from preschool to college and a little bit of everything in between. Right now my focus is teaching my children and running a preschool from my home. Credentials include: Bachelors in Art, Masters in Curriculum and Instruction.
One Comment
Comments are closed.