
Science Art for Kids: Oil and Water Droplet Painting
I love it when process art gets all mixed up with science. Oil and water painting does just that. It’s all about exploring process art while teaching preschoolers about physical science properties. Be sure to check out all our process art activities for preschoolers and read our guide to doing process art with your preschoolers.
It’s a matter and mixtures activity (yeah, that’s chemistry) that combined with some watercolors makes a beautiful piece of frame-worthy art
Or is it science? Frame-worthy science?
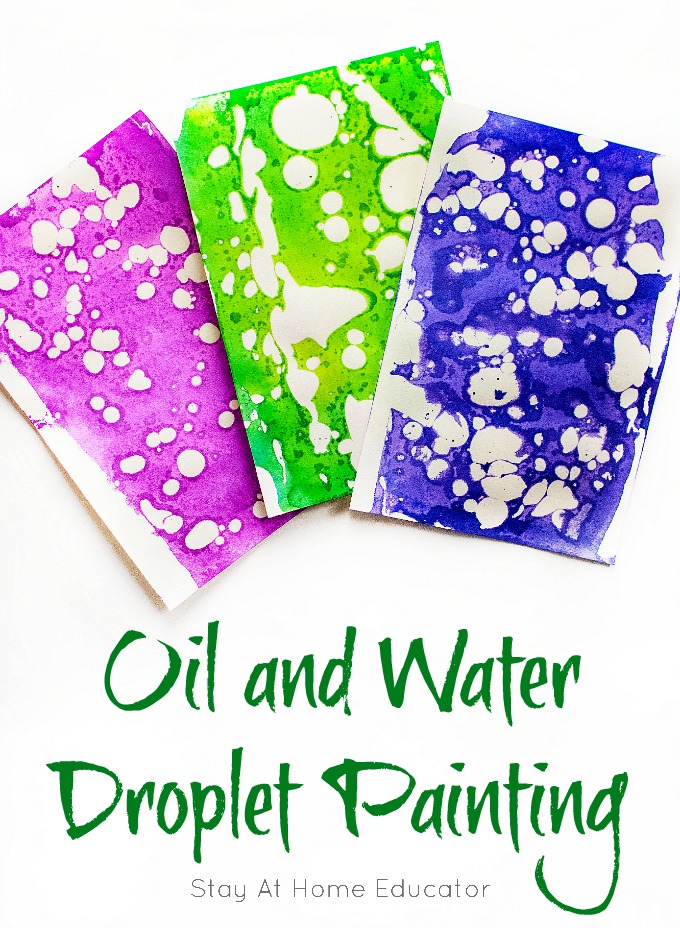
Water and oil droplet painting is a fun and educational activity perfect for engaging preschoolers and older kids alike. This easy technique lets kids experiment with vibrant colors while learning basic science concepts about the interaction between oil and water.
The magic begins as children drop oil onto a canvas of watercolors, watching in awe as the two substances resist mixing, creating beautiful, unique patterns. This hands-on experience introduces them to fundamental principles of matter and mixtures in a memorable way.
It puts the A in STEAM activities!
As they play with this process art method, kids can produce stunning, frame-worthy artwork. The resulting designs are mesmerizing.
-
 12 Fine Motor Task Boxes$10.00
These Cellophane Collages are a fun science art project for kids, too!
Water Craft for Kids
Oil and water painting is the result of mixing cooking oil and colored water to create a beautiful, spotty, slightly marbleized effect. You can find such paper at a craft or stationary store, or you can invite your kids to help you make some of your own, which is tons more fun and tons more frugal.
The process is very simple, as process art should be. And sometimes those are the best science activities, too!
So simple, in fact, that even young toddlers can give it a try and still produce a colorful and beautiful piece of artwork. Yes, even older elementary school kids love it.
Materials
- shallow baking dish
- cooking oil
- liquid watercolor (or water dyed with food coloring)
- heavy paper (sketch paper will do, but watercolor painting paper is even better)
- drying rack (ha, or a cookie rack will work)
- eye droppers or pipettes (Pipettes will give you smaller spots of oil).
The Set-Up
Place a small amount of liquid watercolor in the bottom of a shallow, rectangular baking dish. Pour a bit of oil into a smaller bowl, maybe a quarter a cup is all.
Have your cookie rack set out and ready to collect the papers as they are made. Since the papers will come out very wet using this painting technique, it’s a good idea to have a cookie sheet or old towel under the drying rack.
How to Make Oil and Water Paintings
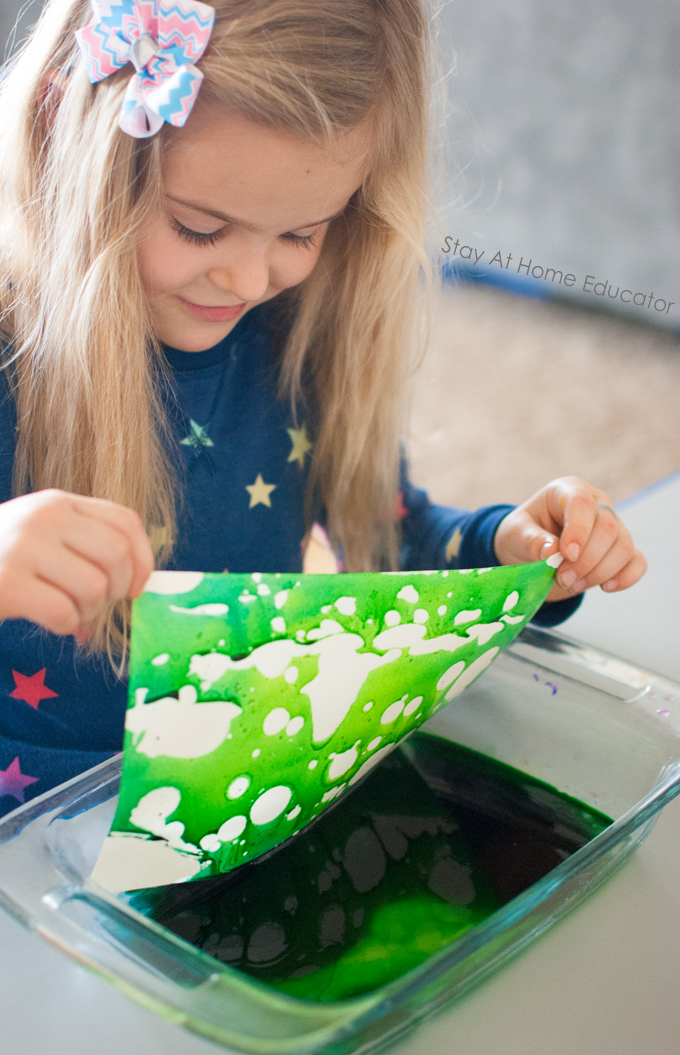
Invite your children to use a pipette to make droplets of oil in the liquid watercolor that is already in the shallow pan.
The first time we did this activity, I did this step myself, instead of asking one of my kids. I found that if my preschoolers were too heavy handed with the eye dropper, we ended up with a thick layer of oil on the water. If that happens, then the paper will pick up only oil and no watercolor.
It takes delicacy, which helps preschoolers develop hand control.
Want more science in your art? Try our String Painting Process Art!
For older children who are less heavy-handed, this really is an excellent activity to strengthen dexterity. And using pipettes over eye droppers allows them to make smaller drops.
You can choose to slightly mix the oil and water for a more marbleized effect, but we preferred to leave the oil in droplets on the water. Lay a sheet of heavy sketching or watercolor paper on top of the water and oil, then pull it out and place it on a drying rack or large baking sheet to dry.
And admire the beautiful works of art! Did you ever think science projects for preschoolers could result in something so pretty?
To bring about even more vivid colors, you can invite your preschooler to use the eye droppers to drop even more liquid watercolor on the paper after you have removed it from the pan. My son noticed it first and said, “Wait, what? Why won’t it go there?” (referring to the droplets of oil on the paper).
The same effect can be achieved by painting with water form the pan, too. Or, use this as a time to add more colors. The key is to add only a little and let this fun science activity work its magic.
Did you know? We have free art lesson plans for preschoolers!
How is This a Matter and Mixtures STEAM Activity for Preschoolers?
Use this as an opportunity to delve into the process of science and art. Painting with oil is a fun art project for kids, but also a beautiful science craft that serves as a neat science experiment, too.
Enter matter and mixtures.
Here are the facts about why the oil resists the liquid watercolor, (and thus create this amazing arts and crafts project).
- Oil is less dense than water.
- That means that the molecules that make up water are packed more tightly than those in the same amount of oil, so water will always sink below the oil.
- Oil and water don’t mix because water likes itself more than oil.
- Oil is non-polar, which means it’s “afraid of water” so it doesn’t like to mix and water molecules are more attracted to other water molecules than oil molecules because they are polar. So, oil only likes non-polar molecules and water only like polar molecules. (Oil and water are snobs like that).
- Detergents like both water and oil, which is why they are so great at cleaning!
- When there are oil spills in the ocean, detergents are used to wash the oil from sea birds who have swam in the oil, saving their lives.
Try this shared art project for toddlers and preschoolers!
Process Art Meets Chemistry
It’s all just a little chemistry, and what a smart way to sneak science into your preschool classroom. Or your kids’ summer vacation.
After the pieces dried, I ironed the paper between two pieces of brown paper bag to lift off the extra oil.
Finally, display or use.
My kids made birthday and thank you cards out of them, but I also thought that a series of them framed would look really great hanging in their bedrooms! Imagine a small gallery wall of oil and water droplet paintings!
Water Art Activities
Wanna’ try more water based art activities with your preschoolers? Try these!
- Just Add Water Art
- Painting and Writing with Water
- Fine Motor Skills Water Art
- Water Droplet Painting
- Water Pouring & Sponge Transfers
Science Painting Ideas
Looking for more painting activities that combine art and science for your preschoolers? Try out some of these awesome ideas!
- Oil Pastel and Watercolor Art for Preschoolers
- Magnet Painting
- Erupting Rainbow Sidewalk Chalk Paint Recipe
- Chromatography Butterfly Craft
- Crystallizing Watercolors

Oil and Water Droplet Painting
I love it when process art gets all mixed up with science. Oil and water painting does just that. It’s all about exploring process art while teaching preschoolers about physical science properties.
Materials
- Shallow baking dish
- Cooking oil
- Liquid watercolor (or water colored with food dye)
- Heavy paper (sketch paper works, but watercolor paper is best)
- Drying rack (a cookie rack works, too)
- Eye droppers or pipettes (pipettes create smaller oil spots)
Instructions
- Gather materials: shallow baking dish, cooking oil, liquid watercolor (or dyed water), heavy paper, pipettes or eye droppers, drying rack, and a small bowl for oil.
- Pour a small amount of liquid watercolor into the bottom of the shallow baking dish.
- Place about ¼ cup of cooking oil in a small bowl.
- Set up a drying rack or cookie sheet with an old towel underneath to catch wet paper.
- Use a pipette to drop small amounts of oil into the watercolor in the dish.
- Lay a sheet of heavy paper onto the oil and watercolor mixture and gently press.
- Lift the paper off and place it on the drying rack to dry completely.
- Optionally, add more liquid watercolor to the paper with pipettes for extra color while it’s wet.
- Once dry, iron the paper between two pieces of a brown paper bag to remove excess oil.
- Display or repurpose the artwork as desired.
Recommended Products
As an Amazon Associate and member of other affiliate programs, I earn from qualifying purchases.


We also have water themed lesson plans for preschool!

I’m Sarah, an educator turned stay-at-home-mama of five! I’m the owner and creator of Stay At Home Educator, a website about intentional teaching and purposeful learning in the early childhood years. I’ve taught a range of levels, from preschool to college and a little bit of everything in between. Right now my focus is teaching my children and running a preschool from my home. Credentials include: Bachelors in Art, Masters in Curriculum and Instruction.
Just found your article. I hope your still responding to comments. I am a bit confused. You said to add plain water to the dish and drop in the oil and lay the paper on top. Then you say you can stop here, but there wouldn’t be any color on the paper right? Or should we be adding the dyed water to the dish?
The oil will resist the water, whether dyed or not, so you can do it either way. You can do colored water in the pan and add the oil droplets and then the paper, or you can leave the water plain, add the oil droplets, do the paper, take it out and then add droplets of dyed water. It works either way. By adding the dyed water last, however, you have the choice to use multiple colors of water, rather than dying the pan of water all one color.
And, as a side note, having water in the pan to begin with allows you to manipulate the oil droplets, too.
This is so clever! I will be trying this with my little one.
Saw this show up on my Pinterest page and they looked too cool not to comment! Beautiful!! Yay! for cheap easy fun : )