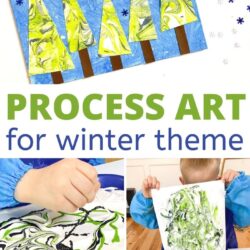
Winter Art Project for Preschoolers
Looking for a winter art project for kids and preschoolers? Here’s a mesmerizing winter landscape process art project! This engaging and creative craft is a great way to welcome the icy season. While you’re in a wintery mood, check out the rest of our winter activities for preschool!
When the weather gets colder, it’s time to dive into winter preschool theme ideas that combine creativity with sensory fun. This winter art project for preschoolers uses shaving cream to create vibrant, one-of-a-kind masterpieces—perfect for a seasonal classroom activity.
Shaving cream is a favorite among toddlers and preschoolers, because of it’s unique texture, and in this winter art project, it’s used to create a marbleized effect to represent the winter skies.
If you haven’t explored the magic of shaving cream in your classroom yet, you’re in for a treat! Preschoolers will love this hands-on art project, and you’ll love how easy it is to incorporate into your winter-themed activities!
Try our Fluffy Playdough Recipe that uses shaving cream.
Preschool Winter Art Project
What’s better than a fun winter art project for preschoolers? This winter craft for kids utilizes process art, which encourages persistence and develops patience and creativity.
No two projects are supposed to look alike and the focus is strictly on the process and not the end result.
Supplies Needed
- Canvas board (preferable)
- Blue and white tempura paint
- Paint bowls
- Toothbrush
- Paintbrushes
- Cotton buds/Q tips
- Shaving cream
- Food trays
- Glitter glue
- Brown construction paper
- White cardstock paper
- Art smocks
- Glitter, snowflake gems, confetti (optional)
I know this is a long list of supplies for these winter paintings, but really, you probably already have everything on hand.
The Set Up
Gather all the materials needed and prep your area. Fair warning – this involves paint, glue, and potentially glitter so it can get a touch messy!
I often use a tablecloth, plastic food trays, and have my kiddos wear art smocks. We use these art smocks for all our art projects, and as long as you don’t wash them too frequently, they hold up really well. (They are art smocks, so it really is ok for them to be covered in paint!)
For ease, I pre-cut the brown paper trunks (about 1/2 inch wide and varying lengths) and after the shaving cream swirls are dry, I pre-cut the large triangles used for the body of the tree.
This step will come later in the project. You can cut the triangles in varying sizes and configurations.
How to Make Winter Tree Art for Kids
Sometimes, snow themed art projects for preschoolers, like this one, have to happen in stages. I like spending a few days on a single art project for my preschoolers because it teaches them about waiting. If this project were all done at once, it wouldn’t work out.
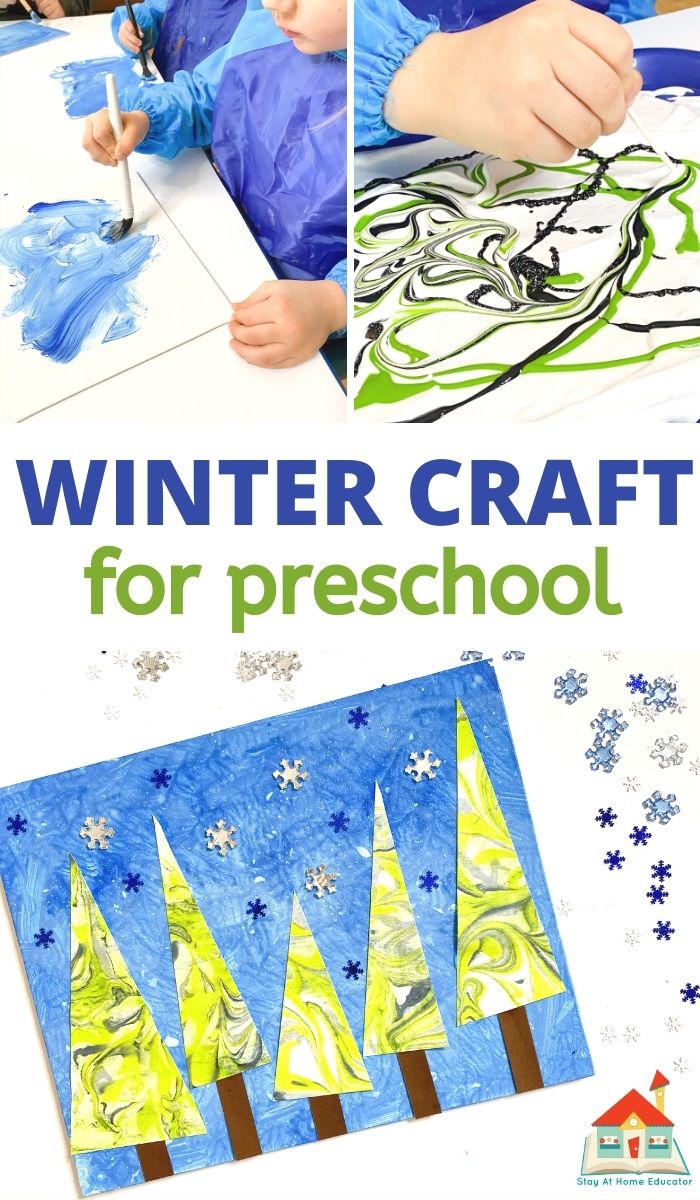
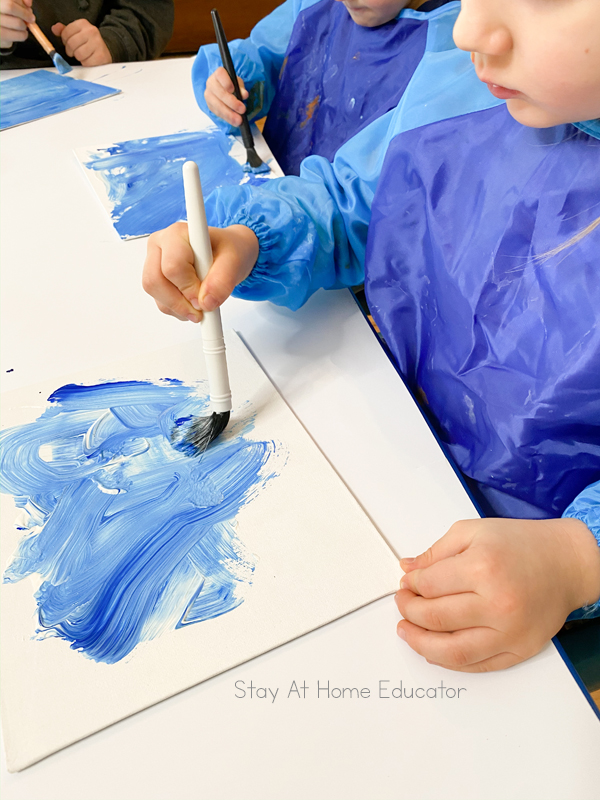
Step 1: Paint the Background
Begin by having your kids paint a canvas board with blue and white tempura paint. Remind them to be careful not to mix the colors too much and to leave some texture and a pretty mix of colors behind.
My preschoolers chose a mix of blue and white paint, but if you add purple, this fits int really well with an arctic preschool theme because the background will look like the Northern Lights.
You can even add a polar bear cut-out in between the trees. If you prefer something a little less messy, try oil pastels and blend them together.
See our January Preschool Theme Ideas page for more inspiration.
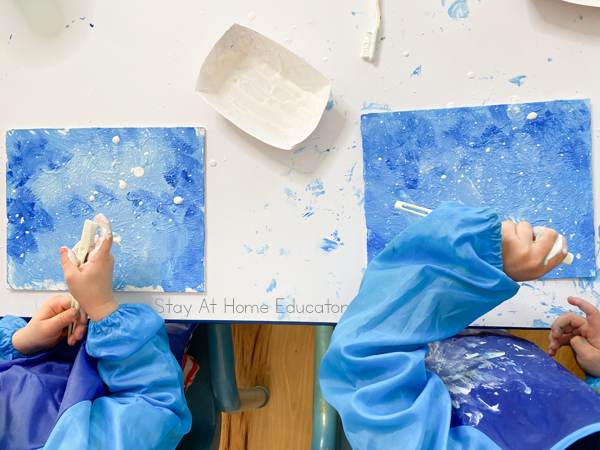
Step 1.2: Add Detail to the Background
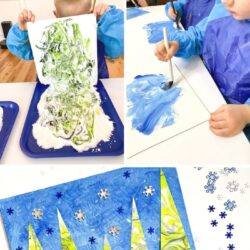
Here comes a messy part – invite the children to “spatter” bits of white paint using a toothbrush to look like a snowstorm onto the blue and white background.
To do this, have the children dip their toothbrush into white paint and turn the toothbrush down so that the bristles are facing the canvas. Drag their fingers slowly across the bottom of the bristles and watch as the white paint splatters across the painting. You can model this with a dry toothbrush for them, if desired!
You might have some kiddos who feel apprehensive about putting their hands in the paint. If you let them know that there’s a trip to wash their hands when they’re done, it might lesson some of the mess anxiety! This is also the point in the project where the art smocks really prove their value.
Step 2: Make Marbleized Paper with Shaving Cream
While the snowy landscape canvases dry, it’s time to move on to another component of this beautiful winter art project for preschoolers. (This can be done the next day, if desired. No need to rush this project).
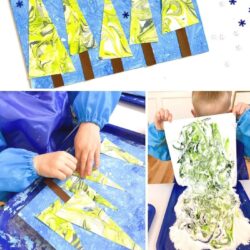
By using a shaving cream marbling painting technique, preschoolers will make triangles that represent winter trees.
Start by adding shaving cream to a food tray. Invite your preschoolers to squeeze liquid paint in swirls all around the shaving cream. We first tried using black glitter glue, but the color mostly got absorbed and it didn’t really work. However, preschool art projects are all about adapting and being creative!
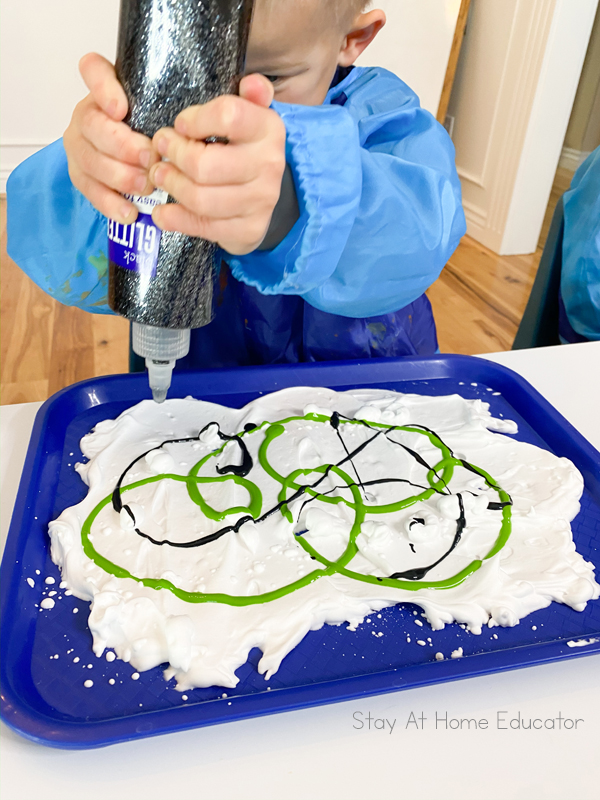
Once all the paint has been squeezed onto the shaving cream tray, use a paintbrush, stick, cotton bud, or any other utensil to swirl and mix all the colors to create a marble effect. This is so much fun for young kids and a great lesson in control – over mixing will lead to all the colors blending to create a murky, mucky color.
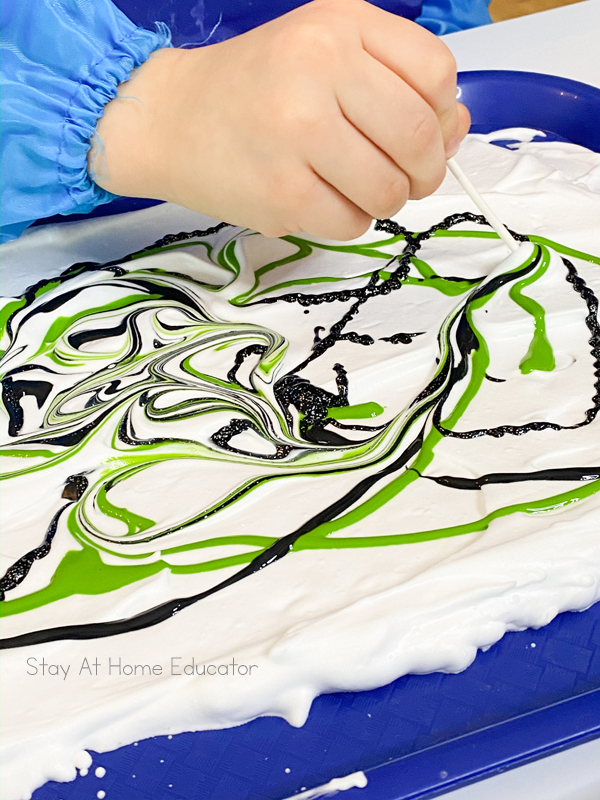
Once the colors have been swirled together to make a marbled effect, it’s time to dip! This part can get very messy, so the adult might want to take over at this part.
Lay a piece of cardstock paper on top of the marbled shaving cream and gently push the paper down to pick up the marbled pattern. Your preschooler will be absolutely mesmerized by this part!
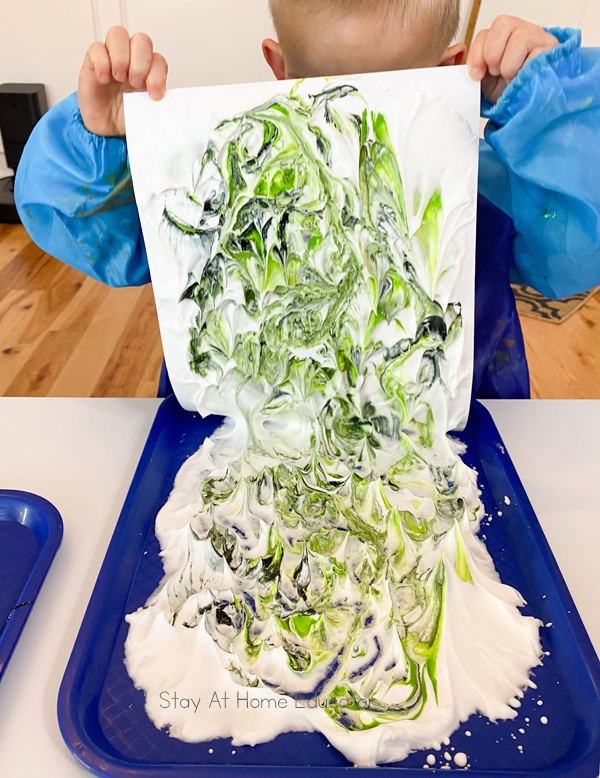
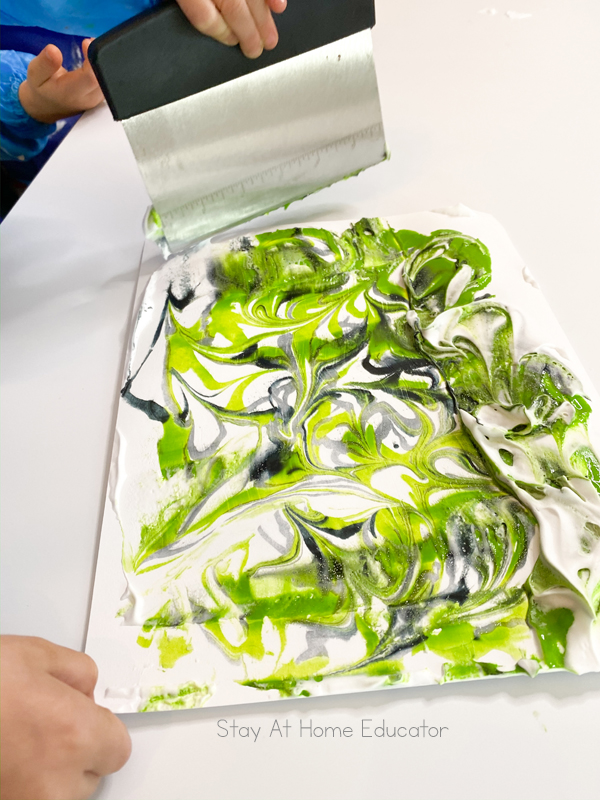
Now it’s time to scrape all that extra paint and shaving cream off your finished product. Use a scraper, a piece of cardboard, or a plastic lid to scrape the excess off the paper. Little hands are welcome to assist with this part, just guide them to scrape lightly.
Once all the extra has been scraped off, you’re welcome to save some of this marbled shaving cream for them to play in later. They can mix all the colors up to see what color it will create!
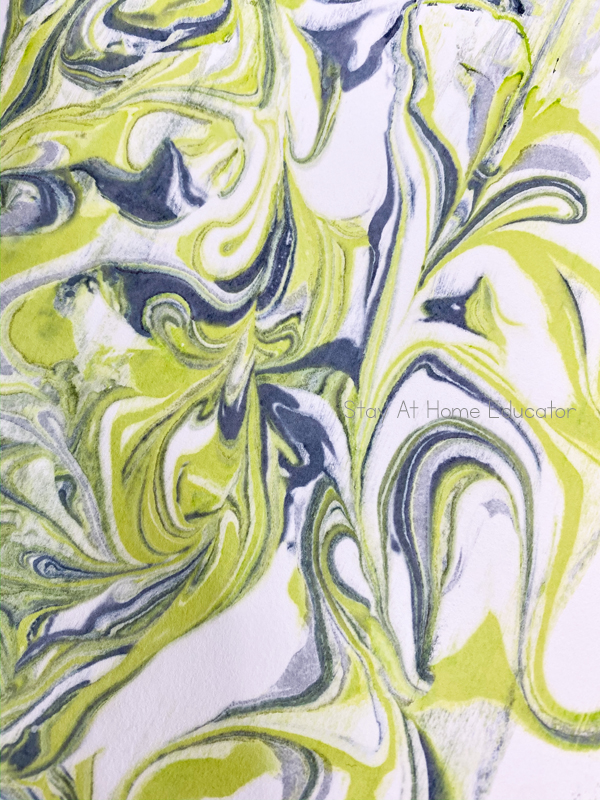
What a gorgeous result! These marble paintings are really magical and so much fun for preschoolers to be involved in. Truly a process, but worth it in the end.
Have you seen our Winter Printable Pack?
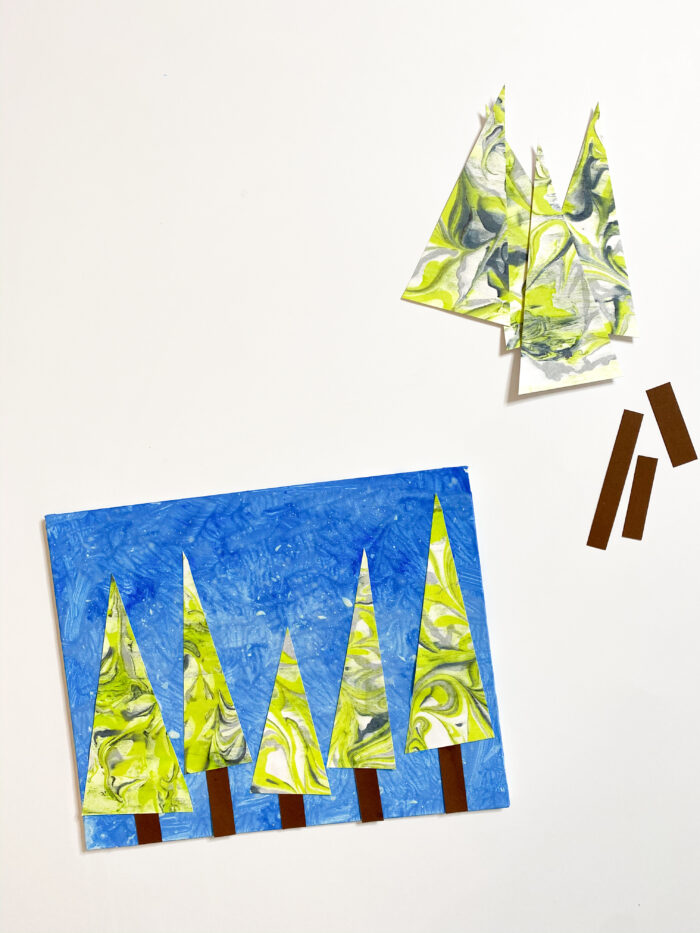
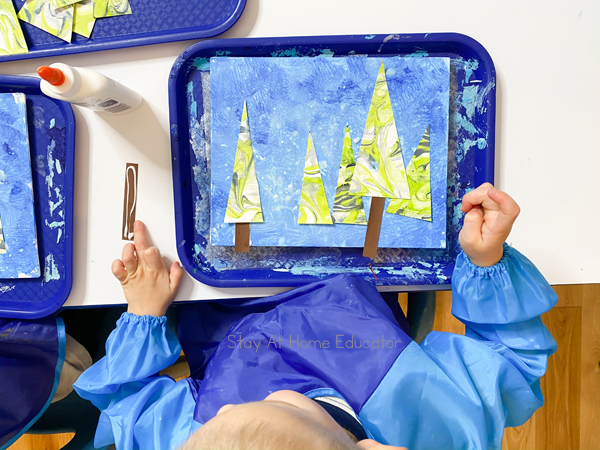
Step 4: Turn the Marbled Paper into Trees
After the marble cardstock dried, I cut out triangles from the marbled paper in varying shapes and sizes for my preschoolers.
I also cut 1/2 inch wide strips of brown paper for the tree trunks. The lengths varied. Preschoolers glued down their tree trunks and then the tree triangles. They decided where everything should go and made their picture to their own liking.
This activity is also great for measuring and estimating. It’s fun to compare the sizes of the triangles and the tree trunks and measure them against each other.
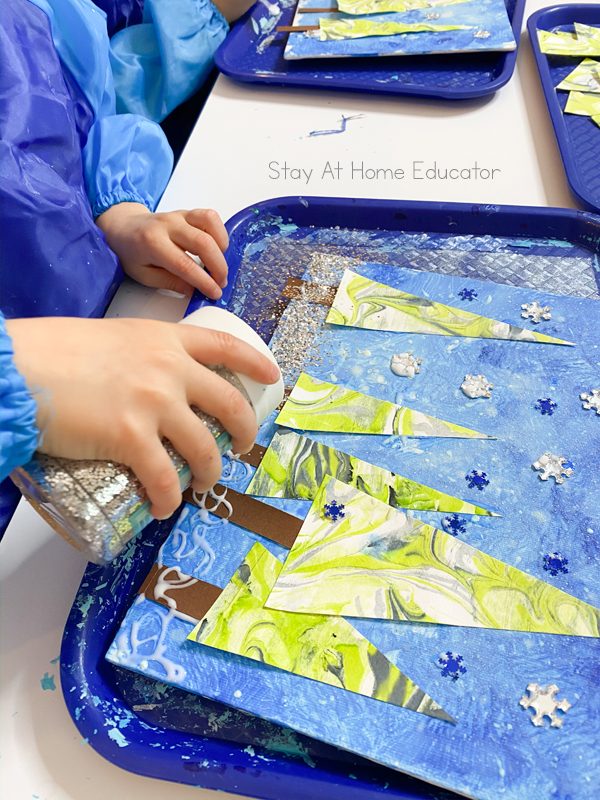
Step 5: Now Add Some Sparkle
Now you could be done at this point (and perhaps your preschoolers are too,) but feel free to finish with silver glitter along the bottom of the canvas, or add snowflake gems and confetti. It certainly adds a perfect winter sparkly touch that brings this winter art project for kids to life!
Here are some of our favorite sparkly art additions.
The end result is a winter art project parents and grandparents will cherish.

Winter Art Projects for Preschoolers
Looking for more winter art projects for preschoolers? Here are some other favorites.
- Frame-Worthy Winter Art for Toddlers
- Fluffy Snowman Paper Plate Craft
- Torn Paper Snowman Art
- Northern Lights Art Project
- Popsicle Snowflakes
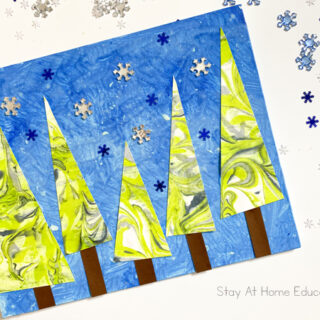
Winter Landscape Art
Preschoolers will use two different process art techniques to create a winter landscape that is beautiful and unique!
Materials
- Canvas board
- Blue and white tempura paint
- Paint bowls
- Toothbrush
- Paintbrushes
- Cotton buds/Q tips
- Shaving cream
- Food trays
- Glitter glue
- Brown construction paper
- White cardstock paper
- Art smocks
- Glitter, snowflake gems, confetti (optional)
Instructions
- Gather all the materials needed and prep your area.
- Pre-cut tree trunks out of brown construction paper.
- Have your kids paint a canvas board with blue and white tempura paint.
- Have them drag their fingers slowly across the bottom of a toothbrush that has been dipped in white paint, making paint splatters across the canvas. This makes a "snowstorm" on top of the blue and white background.
- Set the canvas aside to dry.
- Add shaving cream to a food tray. Invite your preschoolers to squeeze liquid paint in swirls all around the shaving cream.
- Use a paintbrush, stick, cotton bud, or any other utensil to swirl all the colors to create a marble effect.
- Lay a piece of cardstock paper on top of the marbled shaving cream and gently push the paper down to pick up the marbled pattern.
- Using a scraper, a piece of cardboard, or a plastic lid, scrape the excess shaving cream off the paper.
- After the marble cardstock dries, cut out triangles in varying shapes and sizes.
- Preschoolers glue down their tree trunks and then the tree triangles.
- If desired, finish with silver glitter along the bottom of the canvas and/or add snowflake gems and confetti.
Recommended Products
As an Amazon Associate and member of other affiliate programs, I earn from qualifying purchases.


I’m Sarah, an educator turned stay-at-home-mama of five! I’m the owner and creator of Stay At Home Educator, a website about intentional teaching and purposeful learning in the early childhood years. I’ve taught a range of levels, from preschool to college and a little bit of everything in between. Right now my focus is teaching my children and running a preschool from my home. Credentials include: Bachelors in Art, Masters in Curriculum and Instruction.